Pine flooring has long been a favourite among London homeowners, thanks to its rustic charm, affordability, and warm colouring. Whether you live in a Victorian terrace or a modern flat, pine floors can add character and personality to any room. However, over time, even the sturdiest floorboards can show signs of wear – warping, scratches, gaps, and other damage are common complaints we've seen from homeowners and tradespeople alike. The good news? With the right approach, tools, and a bit of elbow grease, pine flooring can be beautifully restored to its former glory—or even improved beyond the way it initially looked. In this blog post, we’ll walk you through the complete process of repairing and restoring pine floors, drawing on expert tips, professional insights, and real-world experience from successful London home renovation projects.
Assessing the Damage and Planning the Restoration
Before diving into the restoration process, it’s essential to assess the current condition of your pine floor. Are the boards rotting, or are they just scratched? Are there squeaky sections? Is there paint or carpet glue residue from previous renovations? Start by clearing the room and giving the entire floor a good vacuum and clean. This allows you to identify problem areas easily. Walk around barefoot to feel for uneven bits and soft patches—these can indicate water damage or hidden structural issues. Make a list of what needs attention: things like filling gaps, replacing damaged boards, sanding out stains, or repairing loose nails or screws. This plan will guide your restoration project and help you decide whether to take a DIY route or call in a tradesperson.
Replacing Damaged Pine Boards
Pine is a softwood, which makes it vulnerable to dents and splits. If your floorboards are severely damaged—due to rot, excessive warping, or infestation—you’ll need to replace them entirely. Choose reclaimed pine boards if possible to maintain continuity in size and tone. Here’s a quick step-by-step for replacing boards:
- Use a circular saw to carefully cut out the damaged board, avoiding damage to the surrounding planks.
- Measure the space and cut your replacement board to size.
- Secure the new board with hidden nails or floorboard screws.
- Make sure the grain direction matches the rest of the flooring for a seamless appearance.
If you're hiring a tradesman for this part, be sure they have experience handling period properties, especially if dealing with original Victorian or Edwardian boards where the spacing and dimensions can vary.
Gap Filling and Squeak Repairs
Gaps between pine boards can be charming—or annoying—depending on their size and how much draught or dirt they let through. We deal with a lot of older homes in London with settling floors and fluctuating humidity, both of which can cause expanding and contracting of the boards. There are several methods of gap filling:
- Wood slivers: Thin strips of pine glued and sanded flush with the surface—long-lasting and visually consistent.
- Sawdust and resin mix: Ideal for small to moderate gaps; just mix sanding dust with filler resin for a natural match.
- Flexible filler: Useful for properties with ongoing movement, but can sometimes look synthetic up close.
To address squeaks, locate the source and gently screw the board down into the joist using a trim-head screw. Sometimes a simple fix like talcum powder between creaky boards can help—but for noisy floors, sub-floor investigation may be necessary.
Sanding the Floor to Reveal Natural Beauty
One of the most transformative parts of a pine floor restoration is sanding. Removing the old finish (be it varnish, paint or wax) refreshes the look of the entire room. Invest in hiring a quality drum or belt sander, and always start with a coarse grit (around 24 or 36), finishing with a fine grit (100 or higher) for a smooth feel. A few tips:
- Sand in the direction of the grain to prevent gouging the soft pine.
- Use an edging sander for corners and tight areas.
- Always vacuum thoroughly between sanding stages to remove grit that could scratch the surface.
- If the boards are thin or previously sanded, be cautious—you don't want to reduce the lifespan of your flooring by oversanding.
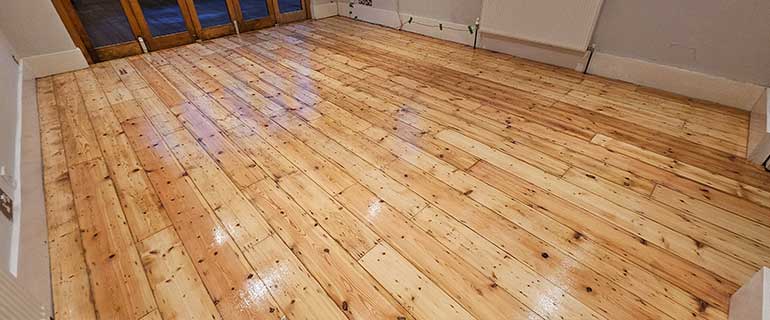
This phase is dusty but rewarding. Many homeowners are surprised to see just how light and vibrant their pine floors look after the sanding is complete—and it's often when they first fall in love with the space again.
Finishing Your Pine Floor: Stain, Oil, or Varnish?
After sanding, the next step is choosing a finish that suits your style and usage needs. Here’s a comparison:
| Finish | Appearance | Durability | Maintenance | Ideal For |
|---|---|---|---|---|
| Wax | Warm, low sheen | Low | Frequent reapplying | Low traffic areas |
| Hard Oil | Natural look with a matt finish | Medium–High | Spot repairs possible | Living rooms, bedrooms |
| Varnish (Polyurethane) | Semi-gloss/satin options | Very High | Harder to repair | Hallways, kitchens |
| Stain + Top Coat | Customisable colour | Depends on top coat | Needs care with application | Design-focused spaces |
For London homes, we often recommend hard-wax oils for their balance between natural appearance and strong resistance to traffic. If you prefer a more traditional look, go with shellac or wax, although these require more maintenance down the line.
Styling Your Restored Pine Floor
Once your pine floor is fully restored and finished, it’s time to think about styling. Reclaimed pine pairs beautifully with modern design elements—think matt black metal fixtures, Scandinavian furniture, or even bold colour palettes with greens, charcoals, and navy blues. Use area rugs for warmth and to help reduce wear in high-traffic zones. If you’re looking to sell or rent the property, a flawlessly restored pine floor is a serious selling point in the London market, signalling charm, sustainability, and timeless appeal. Interior designers working on London conversions or countryside cottages alike have praised pine floors for their seamless integration into both contemporary and traditional themes.
Conclusion: A Worthwhile Investment in Beauty and Value
Restoring pine floors is one of the most rewarding home improvement projects. Whether you’re a DIY enthusiast tackling your first renovation, a professional tradesperson rejuvenating a client’s property, or an architect specifying finishes with character and sustainability in mind—restored pine flooring delivers incredible visual and real estate value. So roll up your sleeves, dig out the sanders and scrapers, and uncover the beauty hiding beneath your tired boards. Your floors—and your future self—will thank you.
Need Expert Help?
If DIY isn't your thing or the scale is too large, don’t hesitate to contact local professionals who specialise in floor restoration. We offer free consultations and a guarantee on our work, giving you peace of mind along with beautiful results. Ready to start your pine floor restoration project? It’s time to bring your floors back to life—better than ever.